
Master Face Turning Octahedron Algorithms
Why has nobody else written these down?!?

This is one of the more difficult puzzles in my collection, but it is not as algorithm-heavy as, say, the square-1 or the puppet cube. Arguably it has fewer algorithms than a 3x3, but detecting pairings and planning piece movements is difficult. It sometimes entails custom setup moves. You have to memorize these setups (say U R), perform the algorithm, and then reverse the setup ( so do R’ U’ once the algorithm is done). I was incredibly disappointed in the online “solutions” I found. Written descriptions of how to solve often didn’t write down the algorithms in proper notation, or any notation at all. The video tutorials were just as bad. I watched one multiple times in slow motion to understand what the instructor was doing. He’s describing the movements in English terms, like “…now just move the paired edge onto a side face, then make sure to move everything back.” When you break apart what he’s doing, there is really a setup (place a sacrificial unfinished edge on a nearby face), a slice move (such as Rw or Lw’, right or left wide moves), a sequence (such as U R U’ R’, although this depends on exactly where the sacrificial edge is), and then the reversal of the slice move. This was not clear at all, and I repeatedly broke apart completed edges during my first solve because I didn’t fully understand this as “setup-plus-algorithm”. With this post I intend to fix this deficit. I’m not taking this on at the moment, but I have had a similar frustration trying to learn the bencisco method of solving the regular FTO. Every tutorial I’ve found sounds like, “…move this piece around on the puzzle until you pair up the face triangles with the correct edge piece”. It makes it sound like these movements are intuitive, but they aren’t, at least not initially, or not to me.
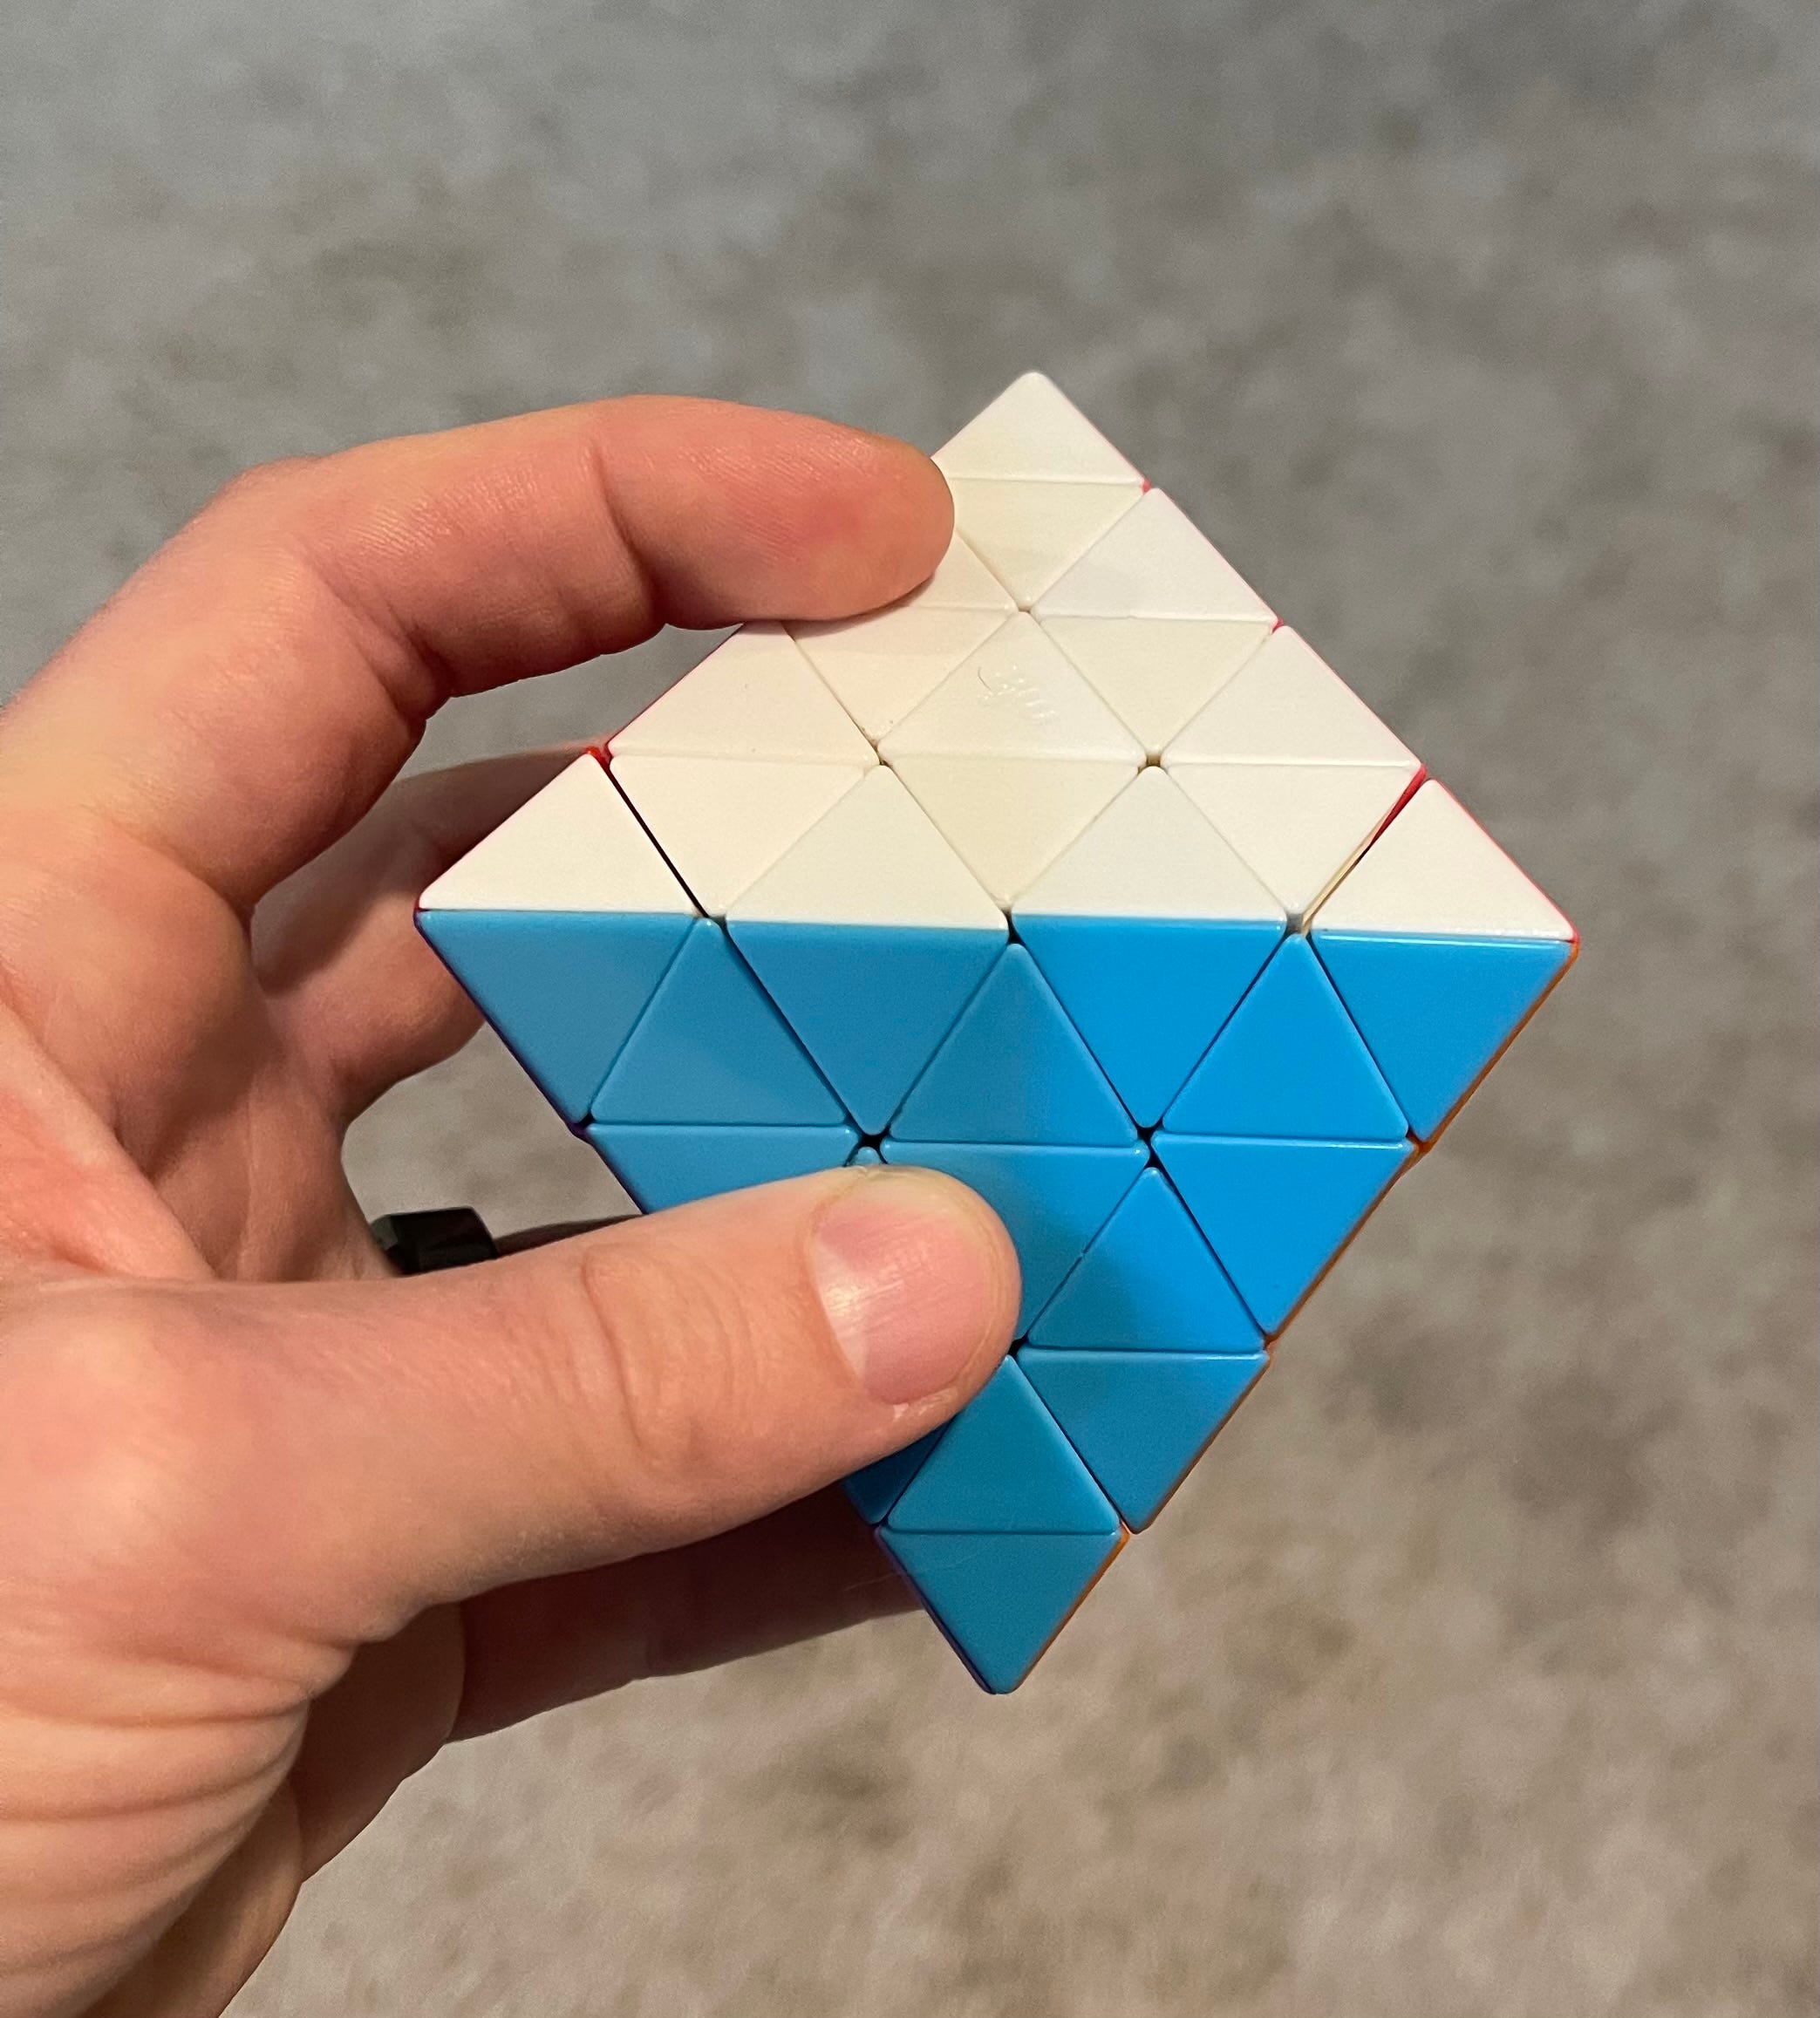
First a few comments on how to hold the puzzle. You’ll want to hold it so that one face, the “U” face, is parallel to the ceiling and ground. Here I’m holding the puzzle with the white face as my “U” face, with one white vertex pointing away from me and two white points going out to either side.
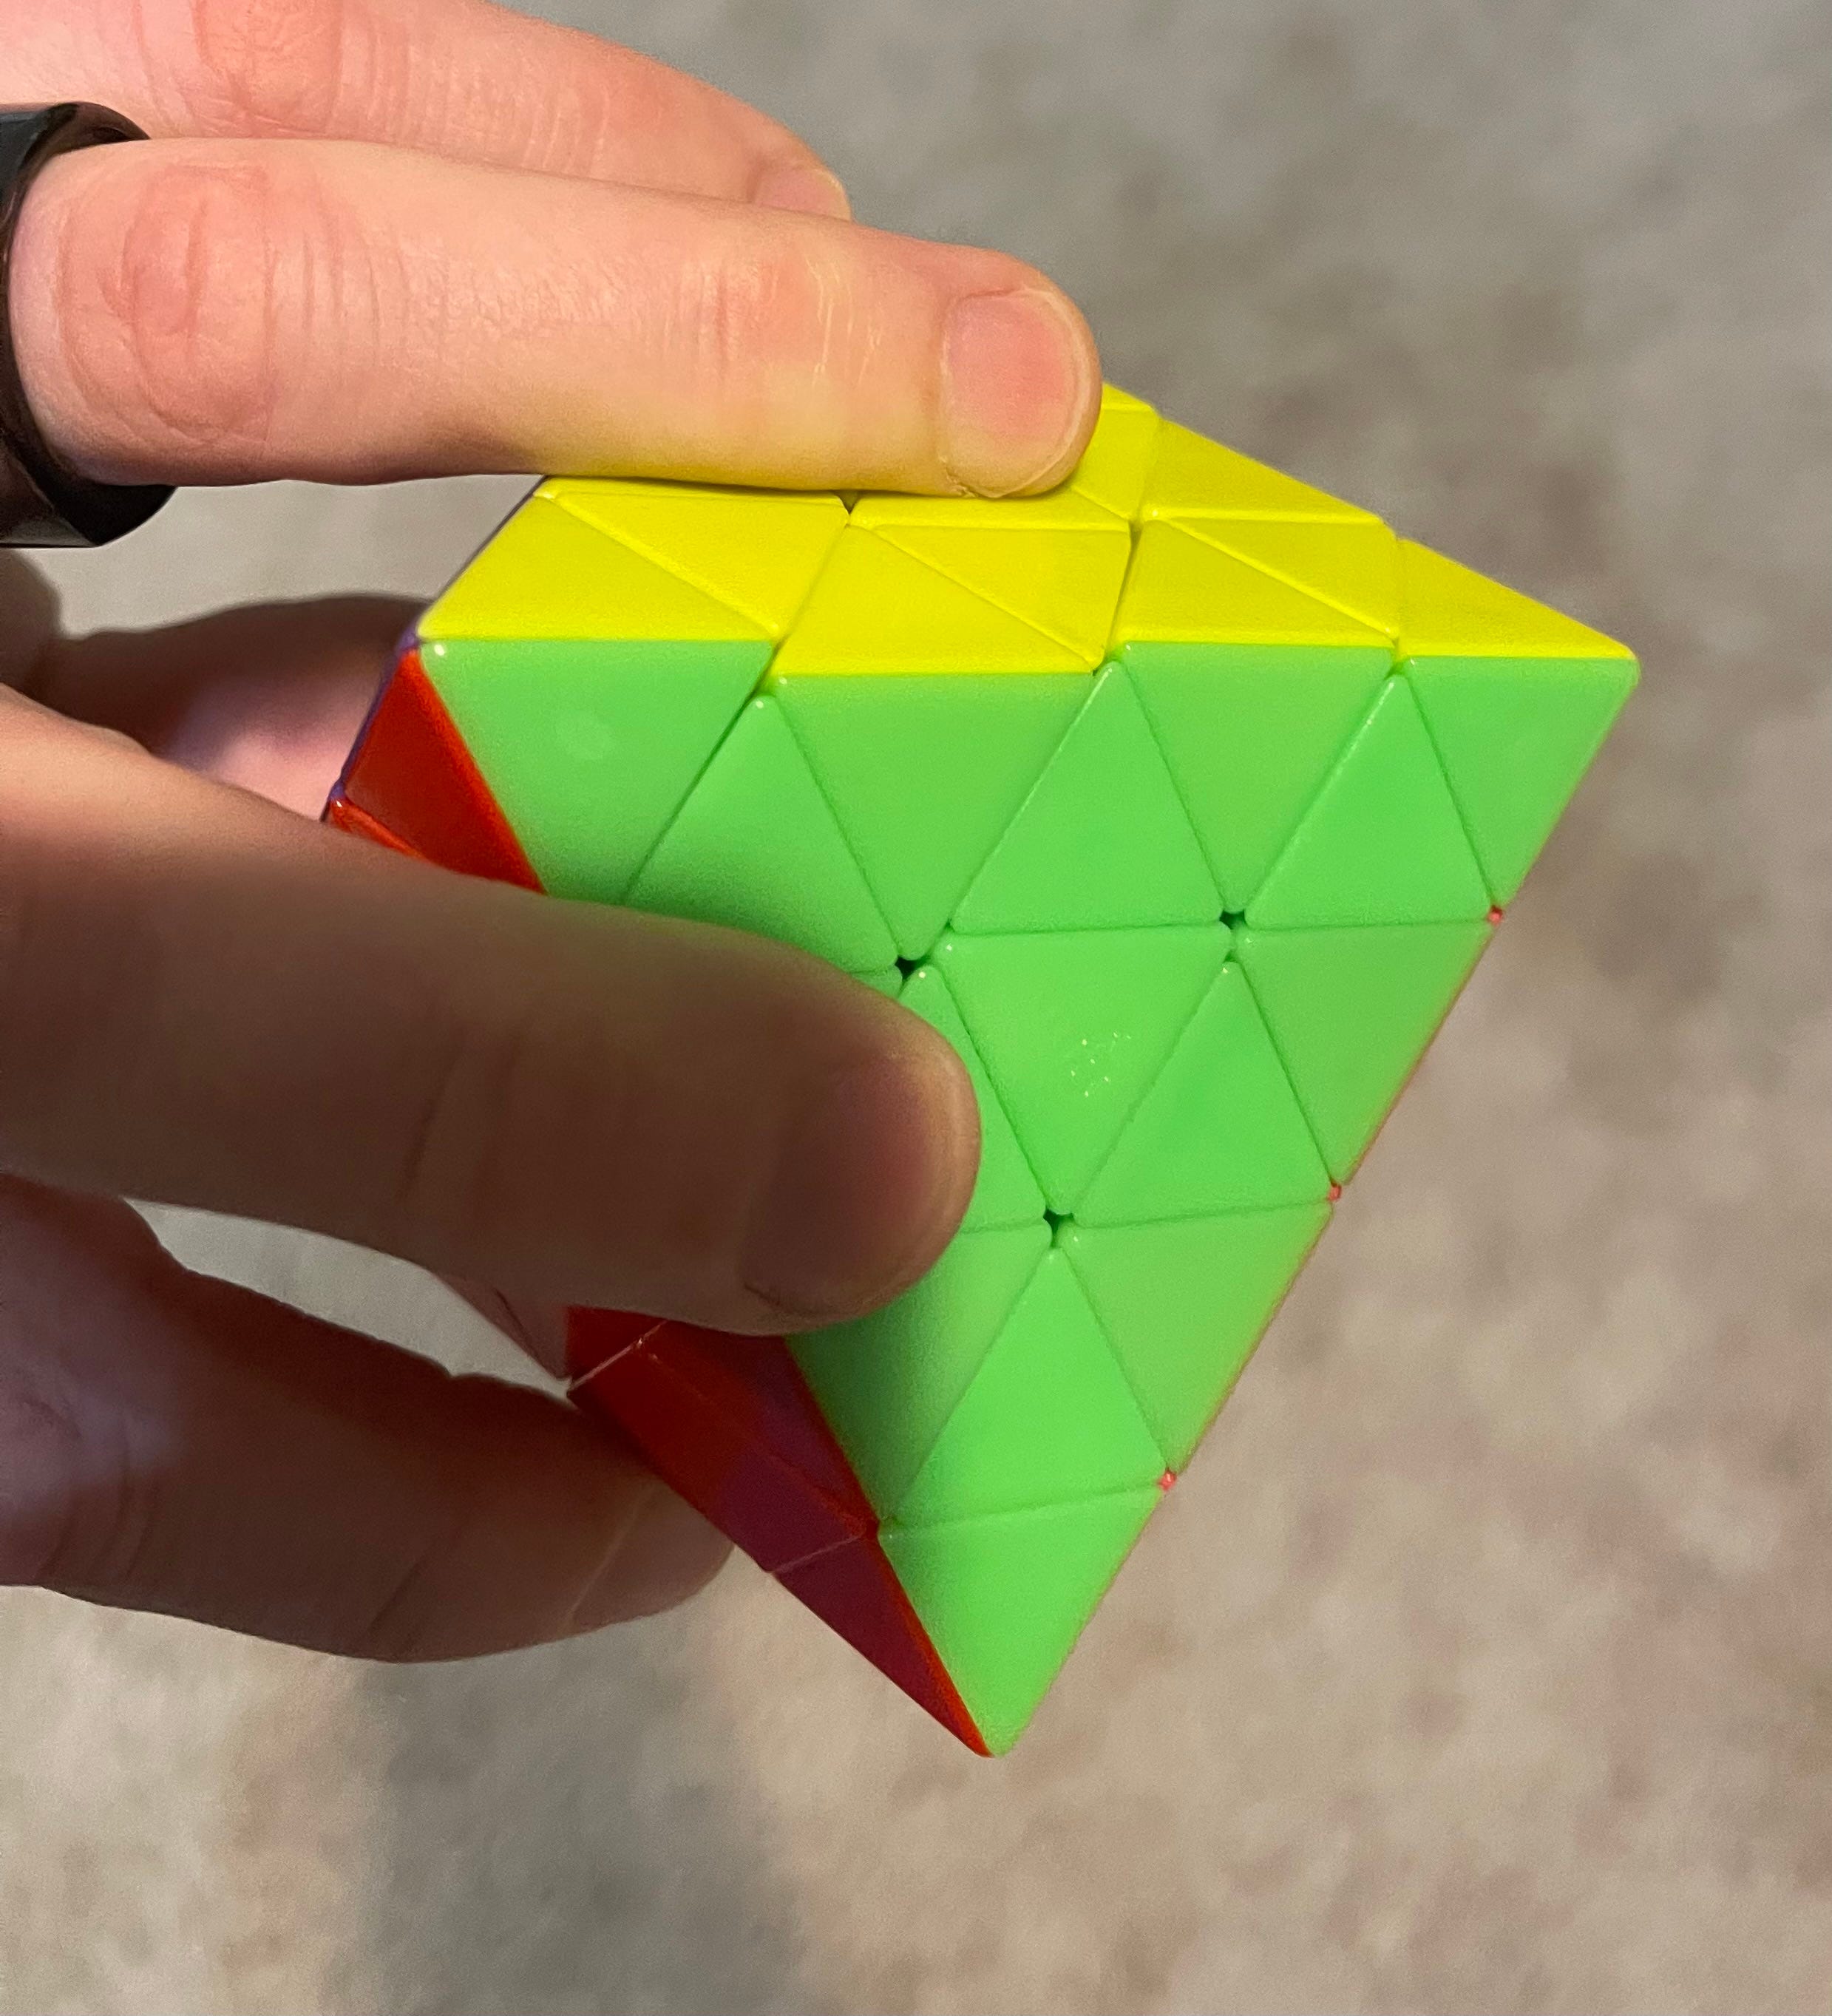
In the picture below, I’m holding the same faces with the same grip, but turning it over to show the down and back faces (yellow is opposite white, so it’s down, and green is the back face, opposite blue).
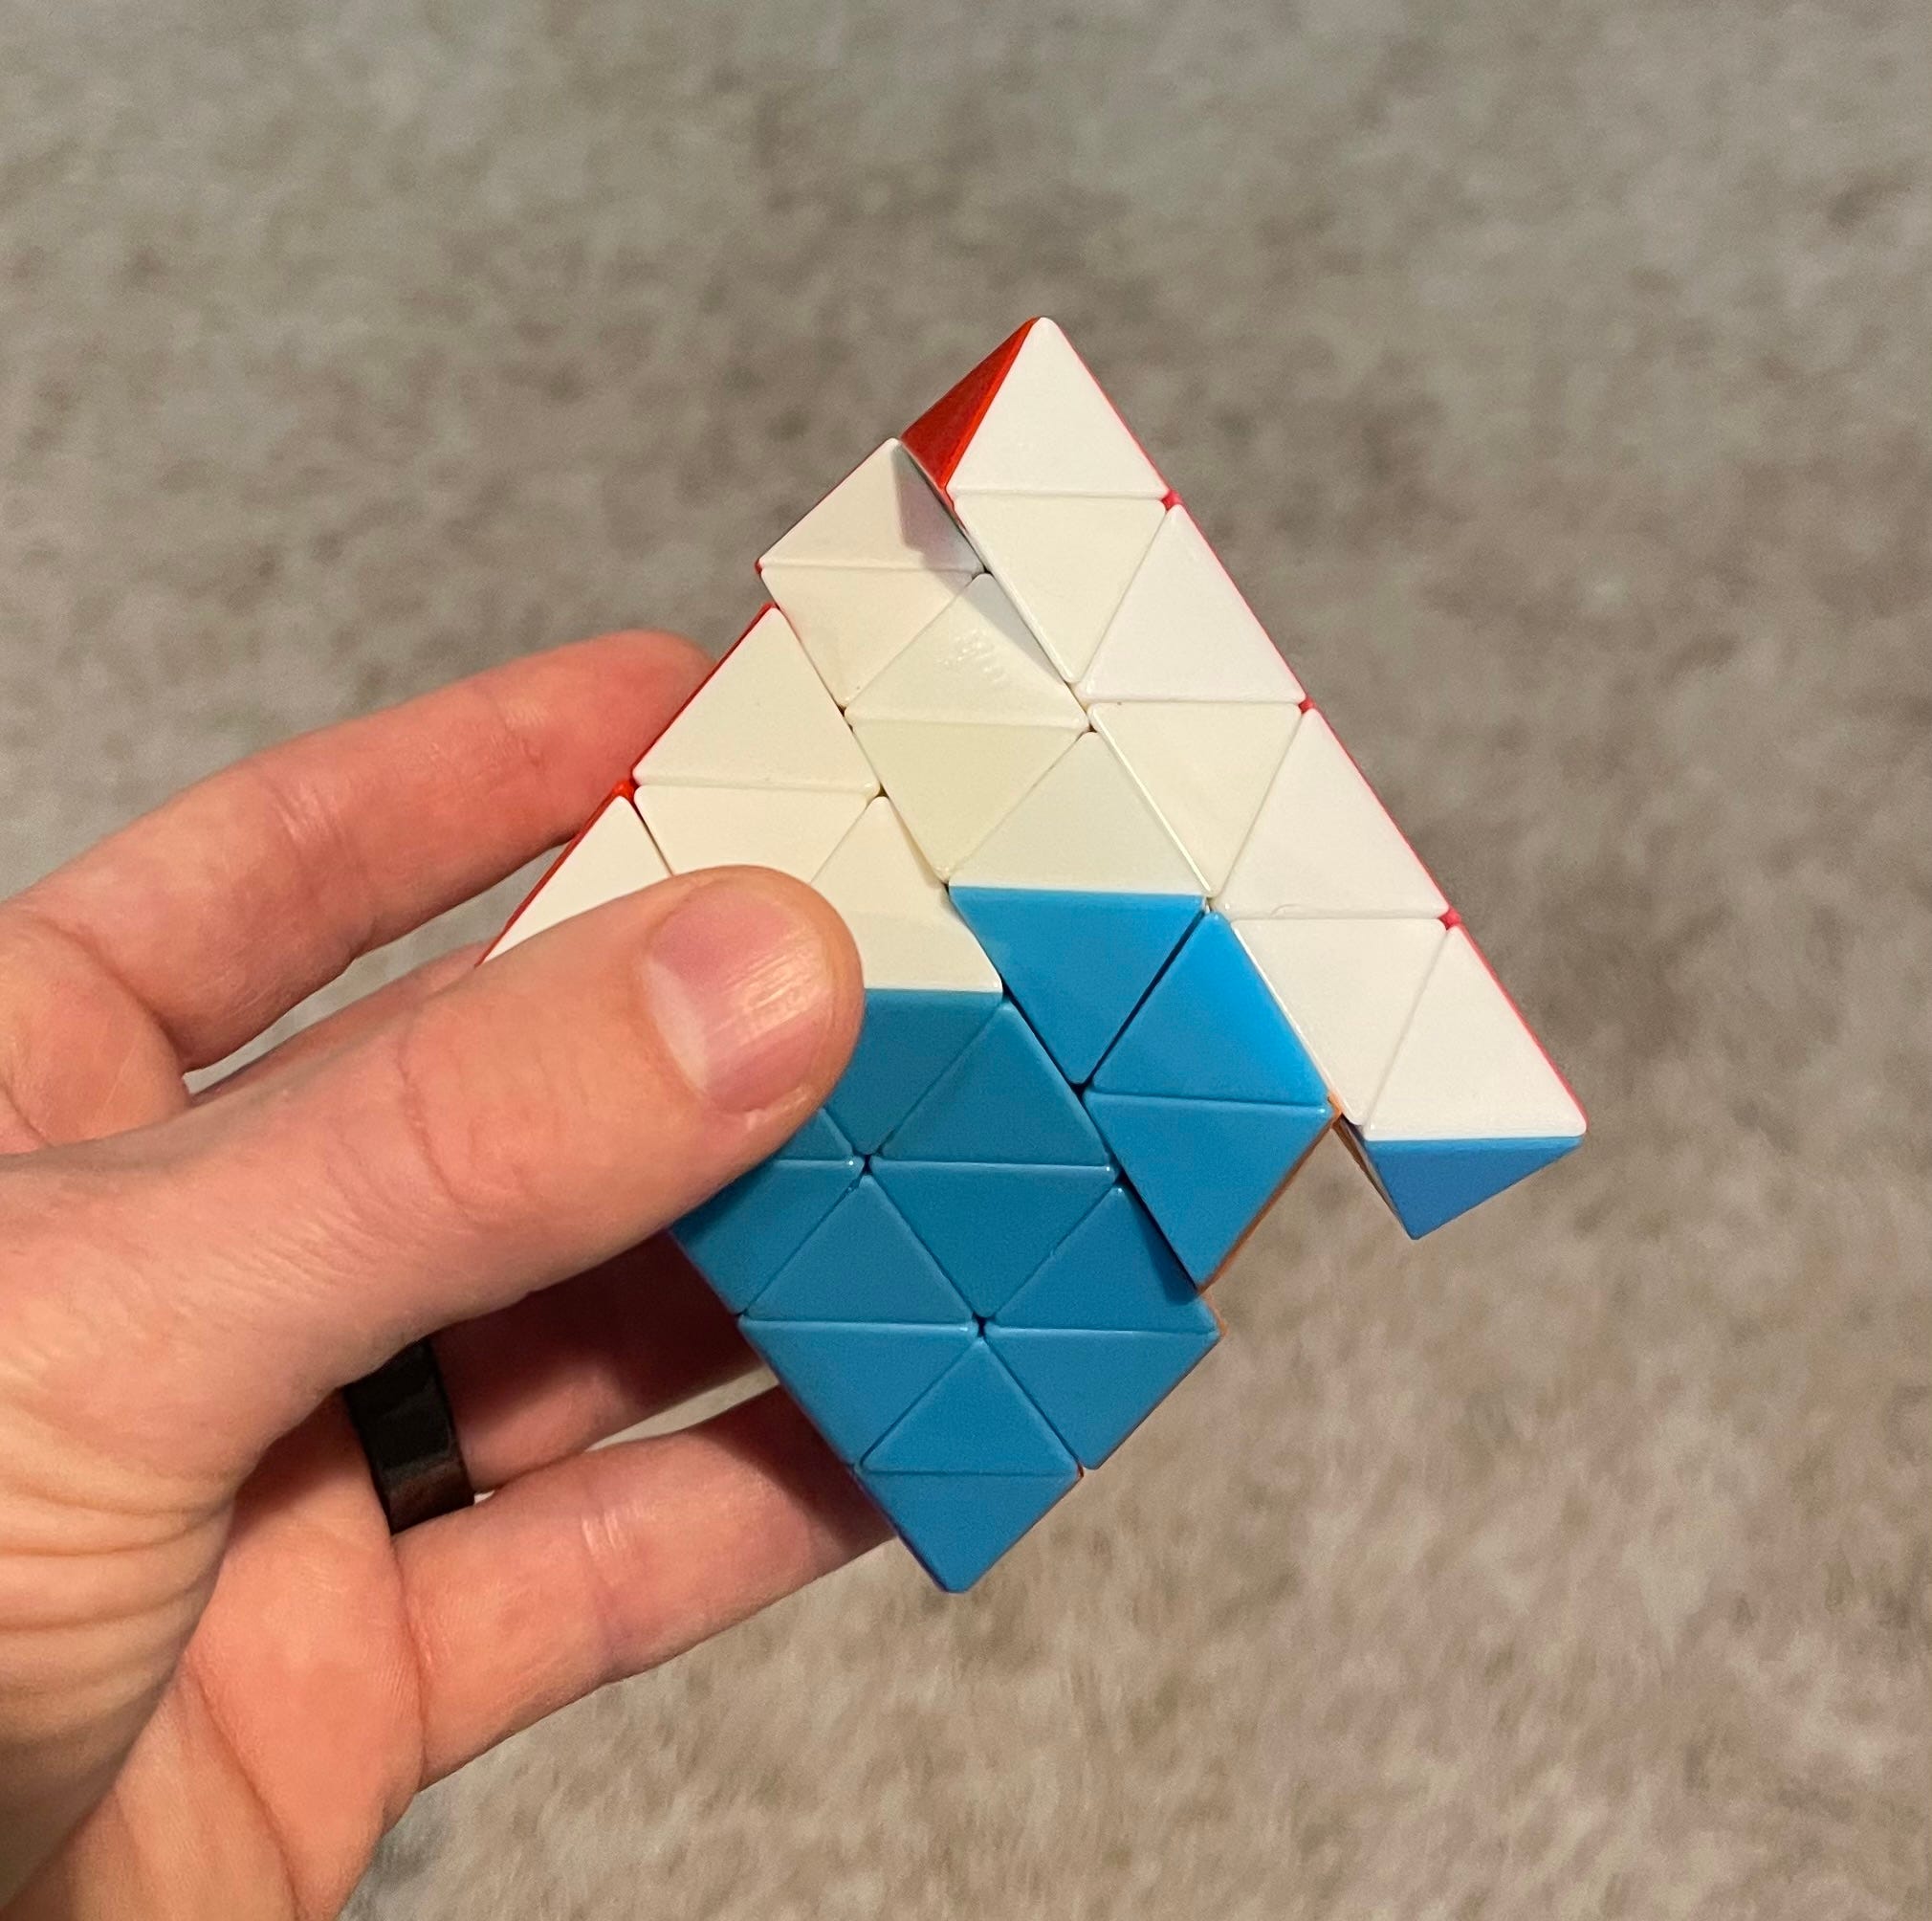
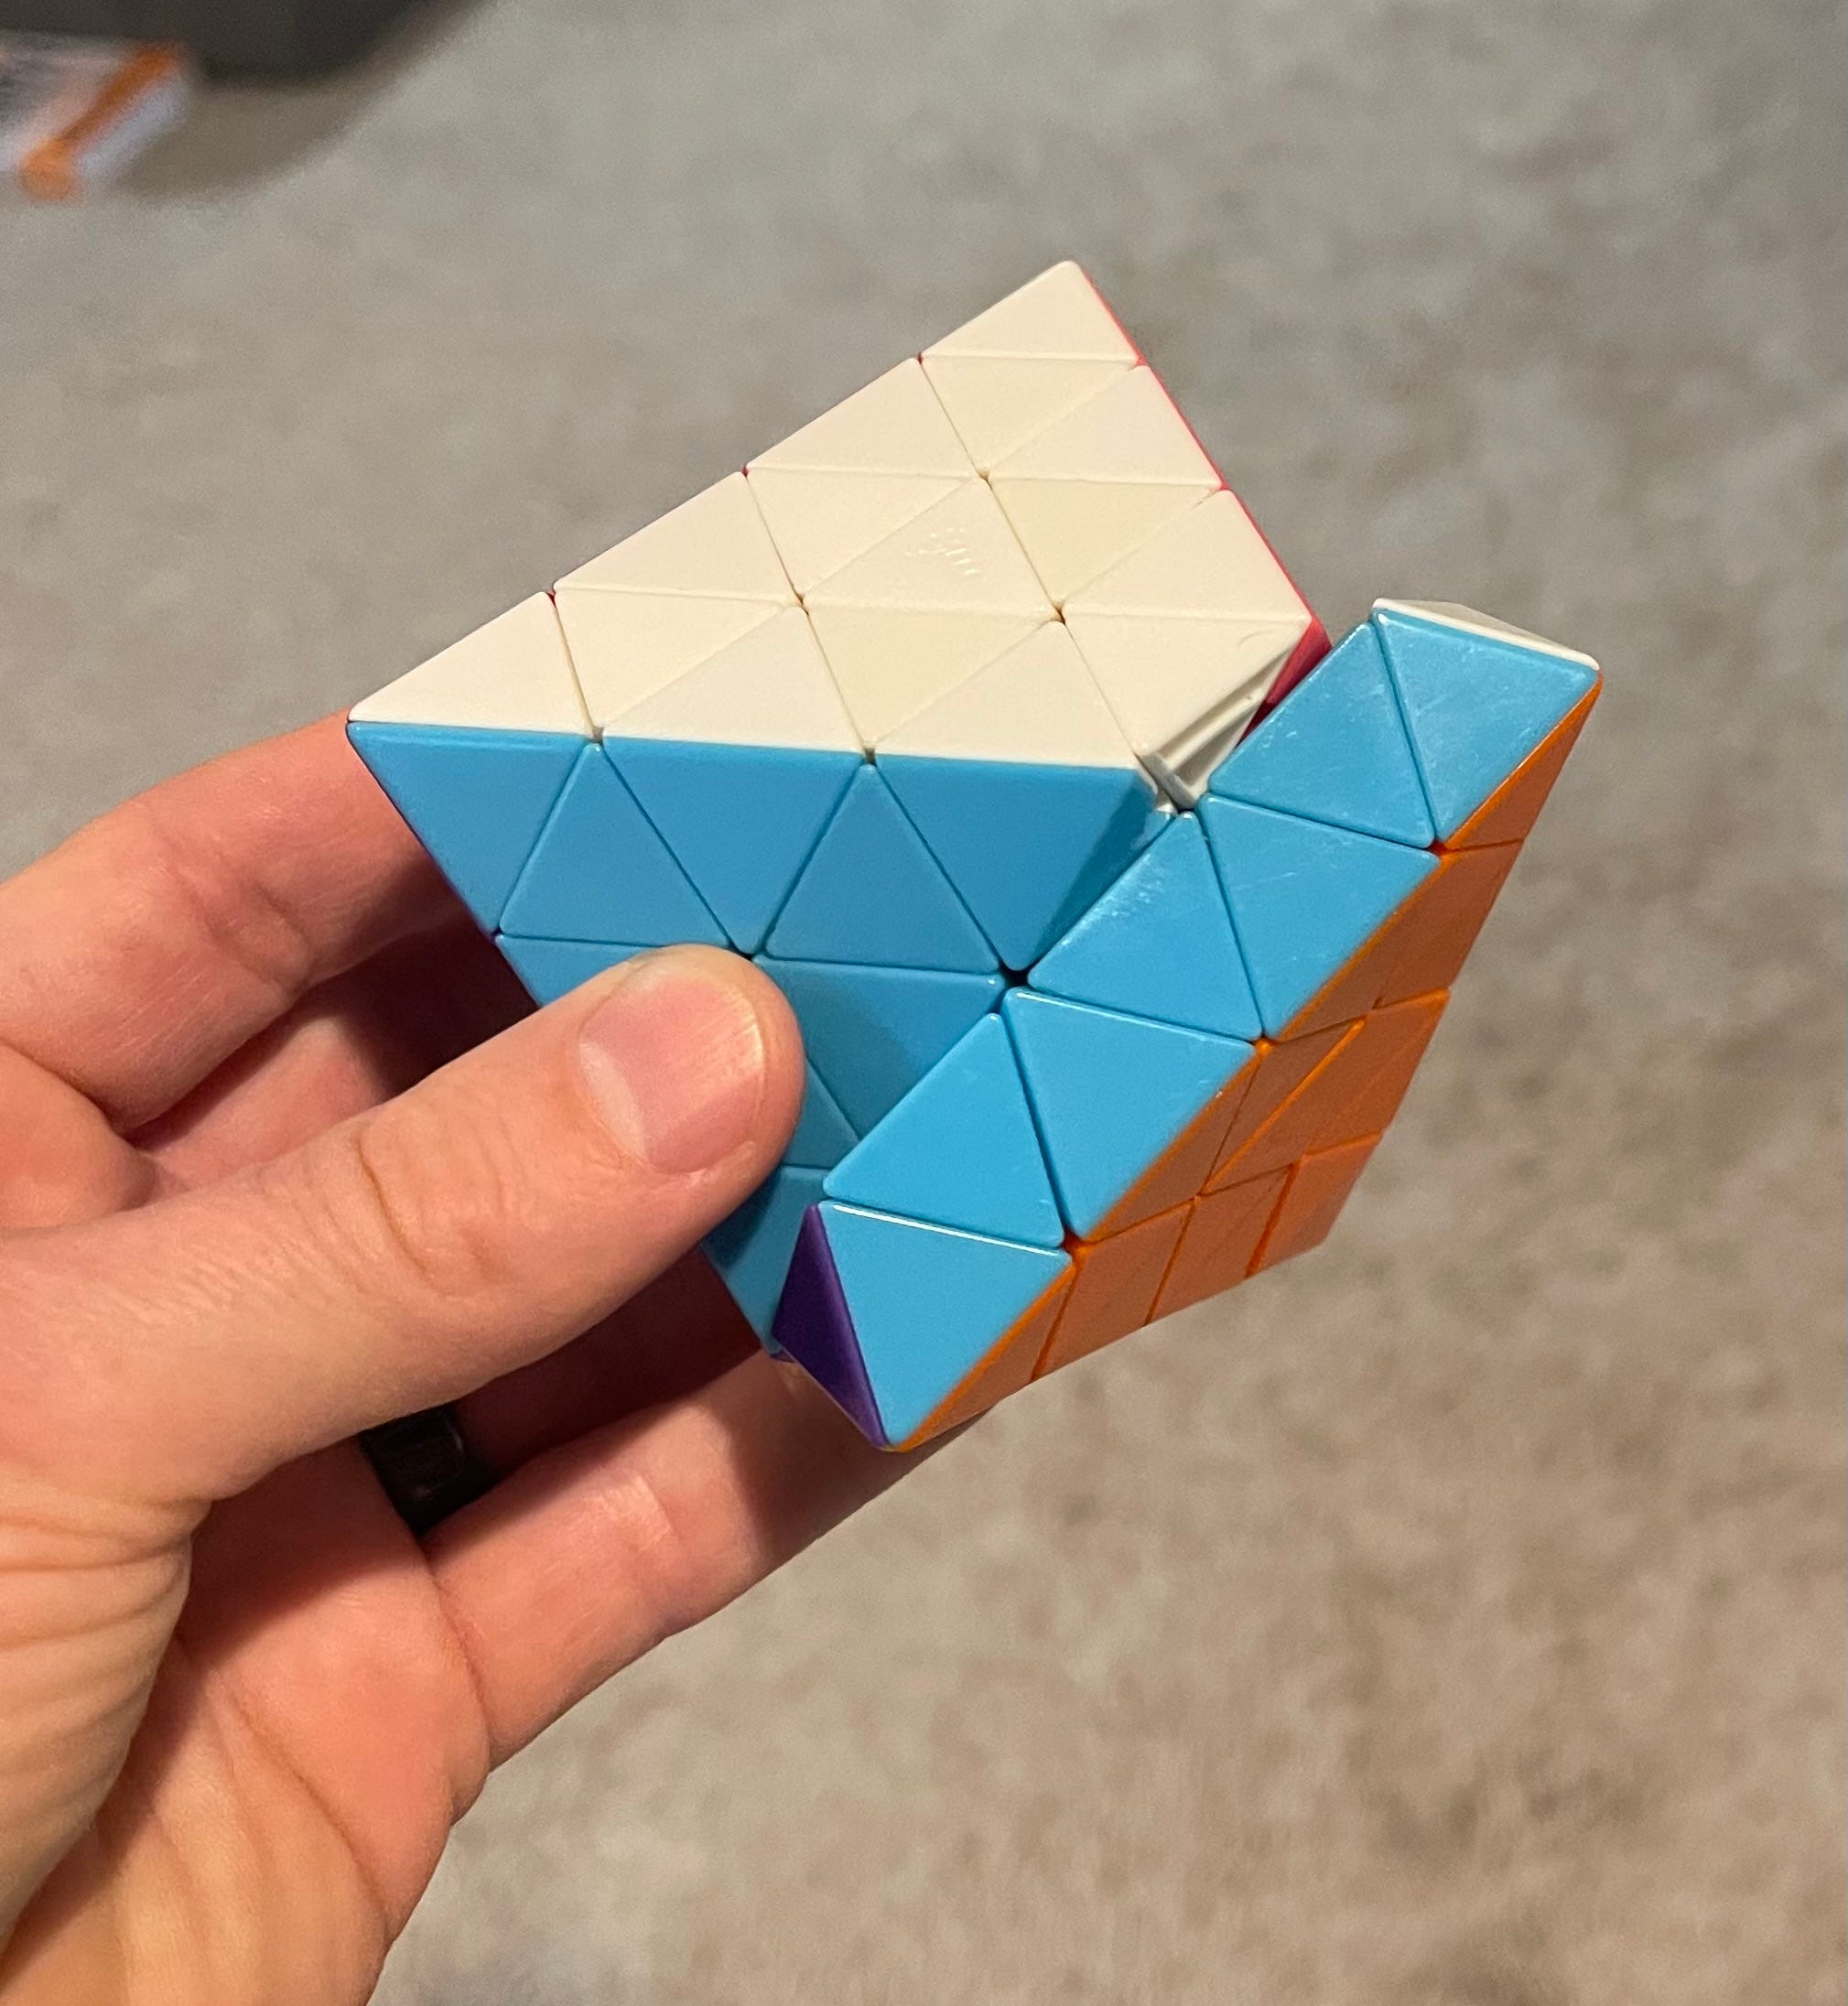
Here is a picture of an uncompleted slice move. I’m calling this one “br” for “back right”. (BRw would be a wide move, a movement of both the BR face and the br slice.)
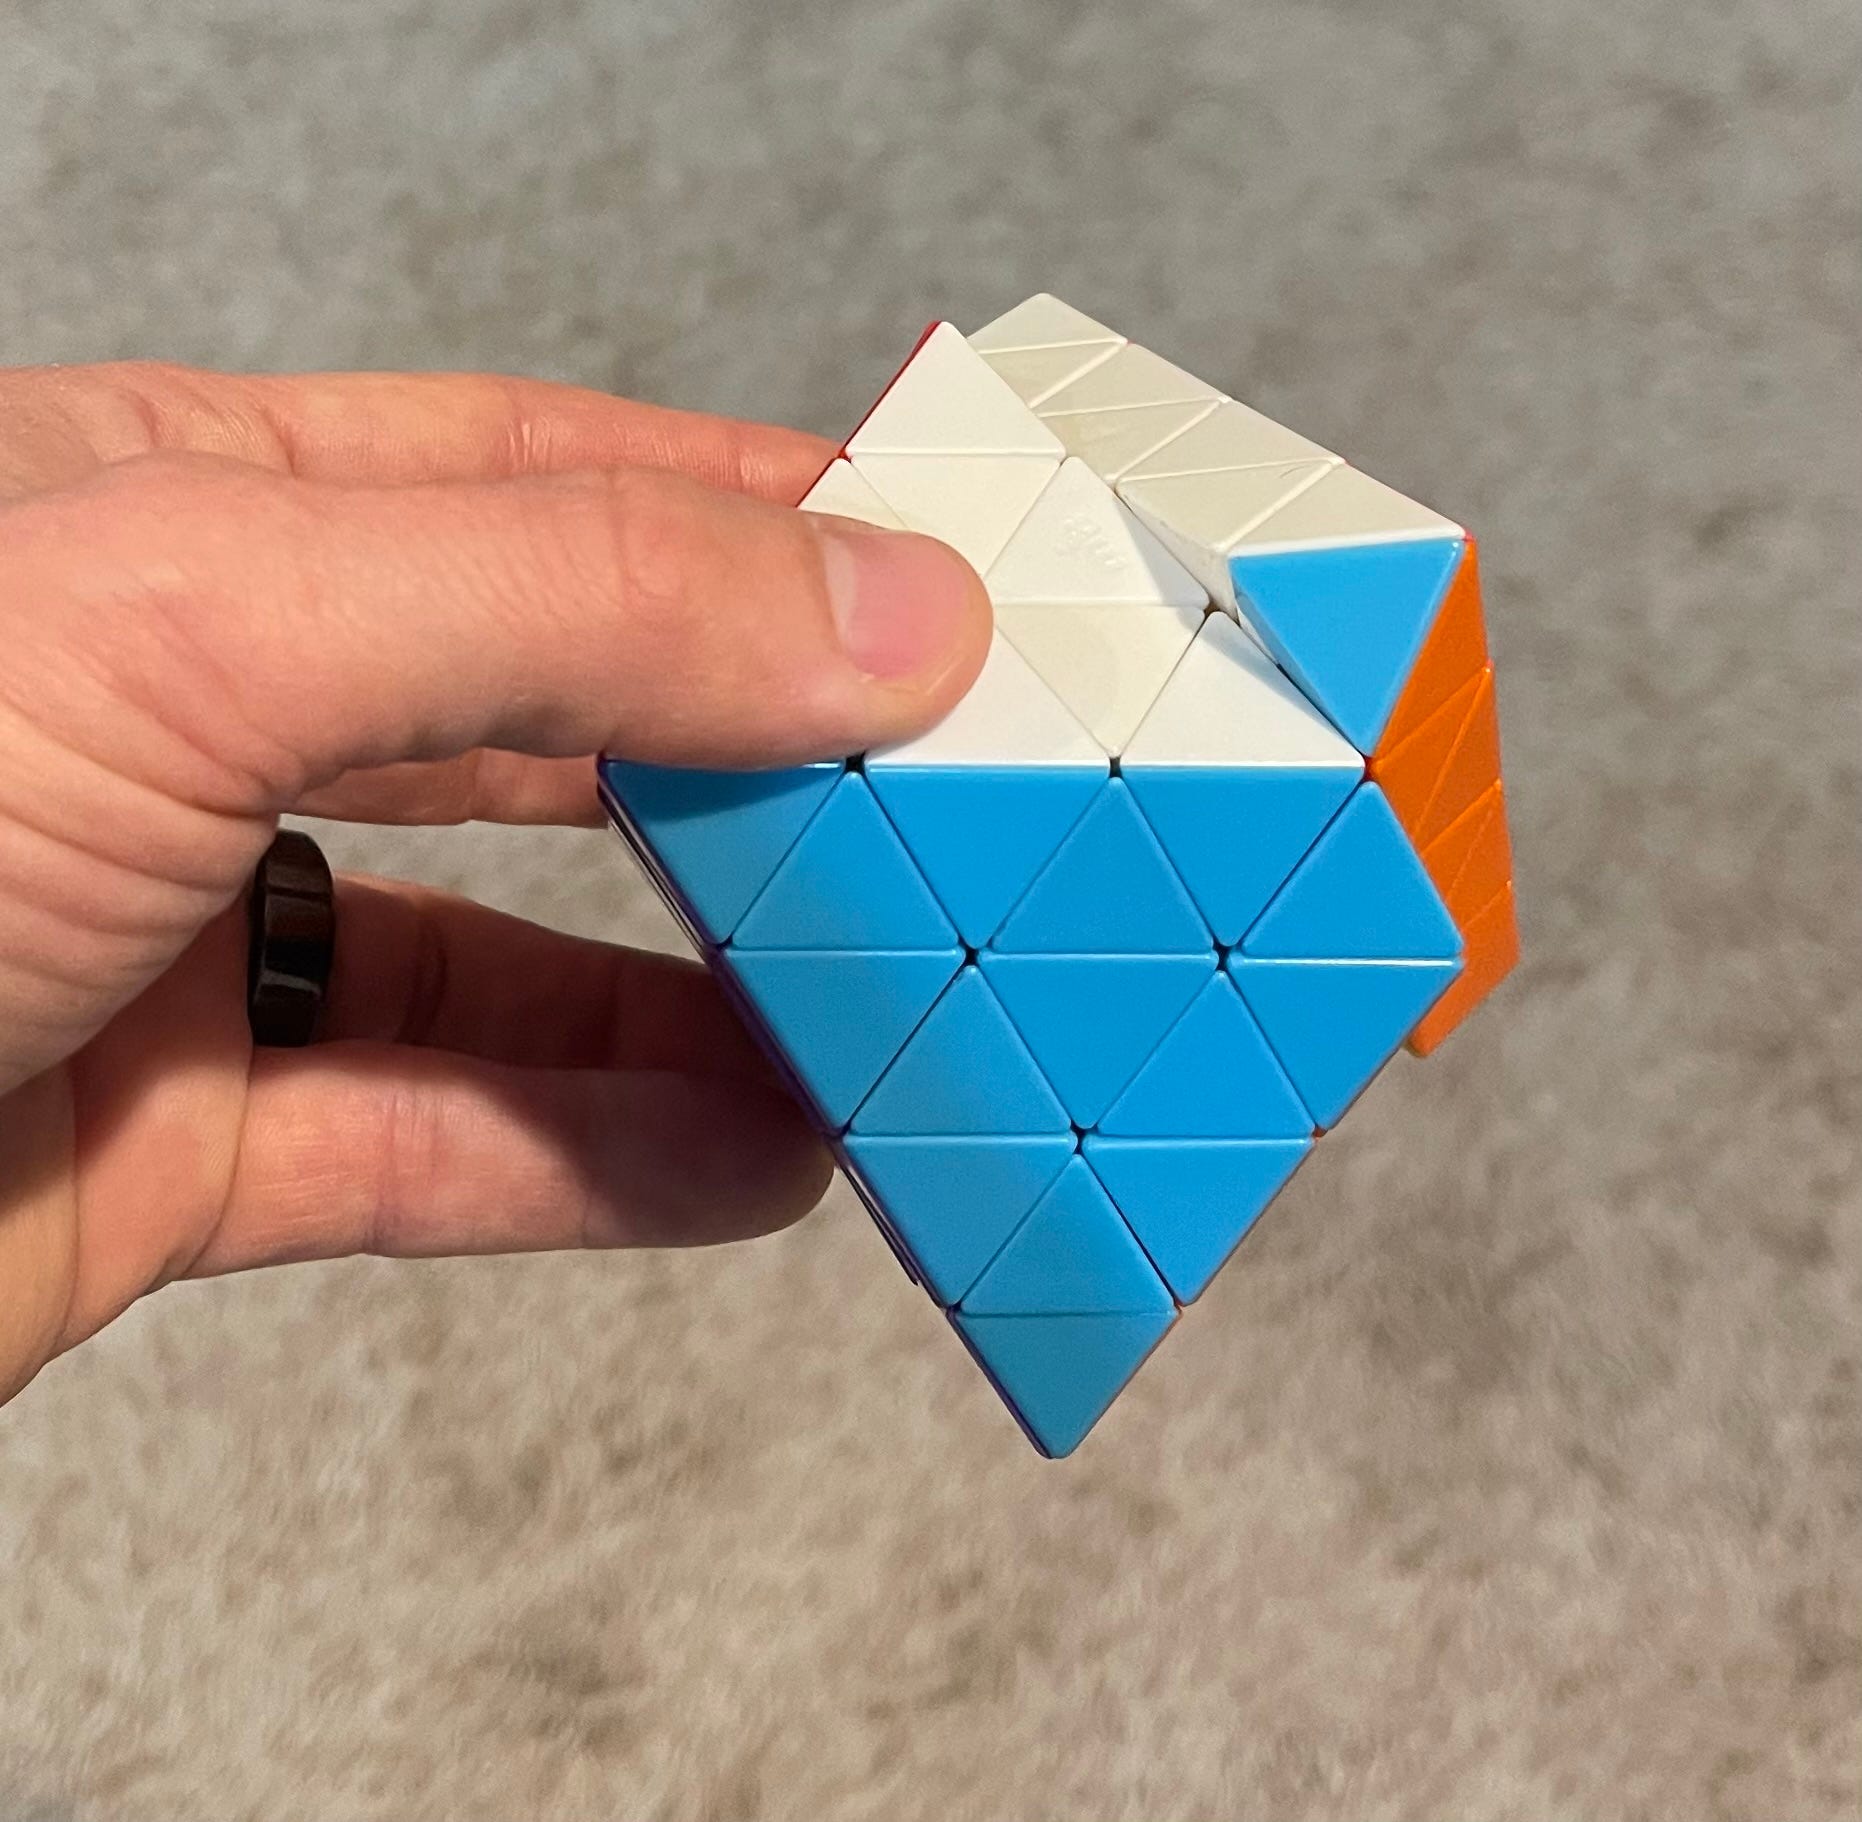
Here is BR, moving the outer back-right face but not the slice.
Here is a Right (R) face move. Right and Left are the faces to the right and left of the Front face (in this example the blue face).
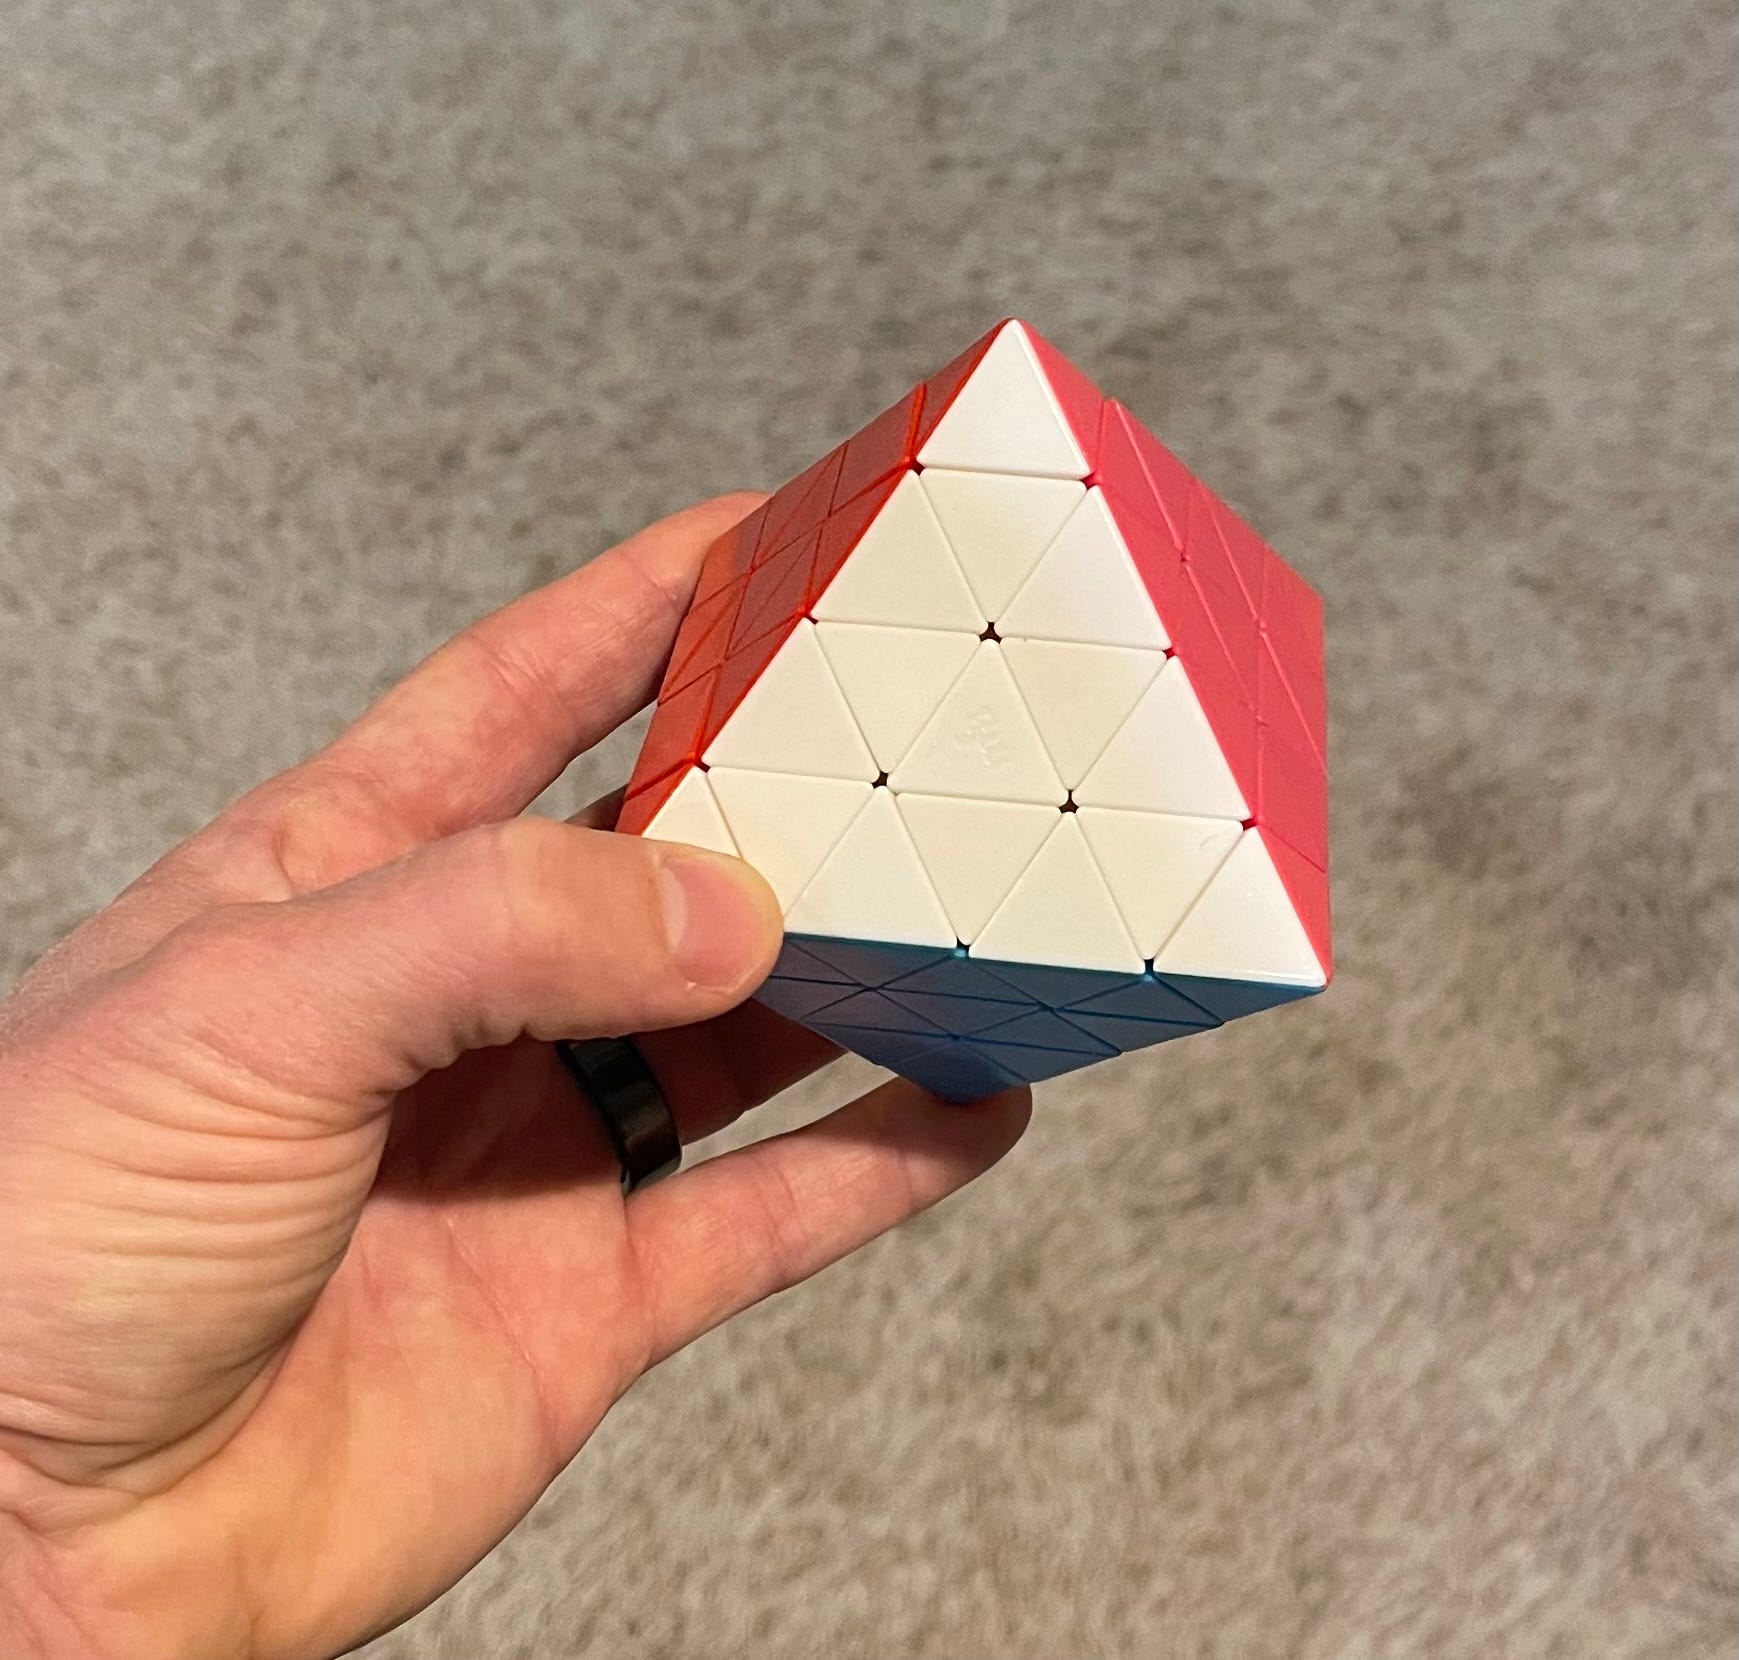
If you’re trying to see multiple faces of the puzzle at once, you can look head on at a face or at a corner and see up to four faces. If you’re trying to memorize and check the color scheme, I recommend looking head-on at a face. This way you can simplify the memorization of the color scheme, such as “Viewing the white face head-on, you can see the red, blue, and pink faces. Moving counterclockwise around the puzzle, it goes red → blue → pink.” From there, just remember that similar colors go on the opposite faces (so yellow opposite white, both being light colors, red is opposite orange, blue opposite green, purple opposite pink). Each face shares an edge with three other faces, so memorizing the colors in this way uniquely identifies the color scheme. I’ll call faces that share an edge “adjacent” and faces that share a vertex (but not an edge) “tangent”. Immediately below is my preferred “view a face head-on” approach.
Below is a vertex-on look. I think this is not as useful for memorizing the color scheme and the order of the colors, because there are three vertexes that will show the white face (for example) and I’d have to remember three different color orders or find a particular vertex.

Align Centers
Start by correctly placing the single-color center triangles that are in the middle of each face. This can be done intuitively, and typically with only a couple of moves. There is not a complex algorithm, simply do wide or slice moves to get white opposite yellow and so on. (No, really, you don’t need algorithms.)
Pairing Edge Pieces
You want to form completed edges, each of which consists of two bi-colored triangle pieces (the ones that have a surface on two adjacent faces) and two single-color center-edge triangles (so not the very center and not the ones touching the corners). The property we’re going to exploit here is that completed edges are not broken by face turns. You have to do slice moves to break them or to assemble them. So once these are built, we can solve the puzzle using a combination of face turns and slice moves that get undone as part of the algorithm (so a b is always followed by a b’, a br is always followed by a br’ and so on…edges that get broken are always reconstructed as part of the algorithm).
The setup for this step is to place half the unfinished edge on the “up” face on the front edge. Note that a slice or wide move always skips the adjacent layer (where faces share an edge) and attach to a tangent layer (where the two faces touch at a point on the corner). The other edge piece you wish to pair up needs to be on the right or left face on the bottom edge. (Try doing some wide moves and undoing them to see which pieces go where. This is easiest to see on a solved puzzle, but that’s not totally necessary.) Place a “sacrificial” unfinished edge, one that you don’t intend to complete in the next step or two, on the face that’s part of the wide move. E.g. if you’re doing back-right-wide (BRw), the sacrificial edge should be on the back right face, place it on the edge that it shares with the back face (the slice move will move it up to be adjacent to the right face). You want to move your finished edge out of the way, move the sacrificial piece in, and restore other edges (and centers…these move out of their correct positions when you do wide or slice moves). So do U’ BR U BR’. Then undo the wide move (BRw’). So the full algorithm is: BRw (U’ BR U BR’) BRw’ . Note that this is just an example. It could start with a BLw’ and end with a BLw move, and the middle part could be U BL’ U’ BL or U BL U’ BL’, depending on where the sacrificial edge is. It’s better to think of this as “wide move - ‘sexy’ algorithm with the right or left hand - undo wide move” than to memorize a specific sequence.
You can do this sequence to pair up two similarly colored two-color edge pieces, or you can also use it to pair up a two-color edge piece with the corresponding one-color edge triangle. But once you have a few edges completed, there is a better way to place the one-color edge triangles.
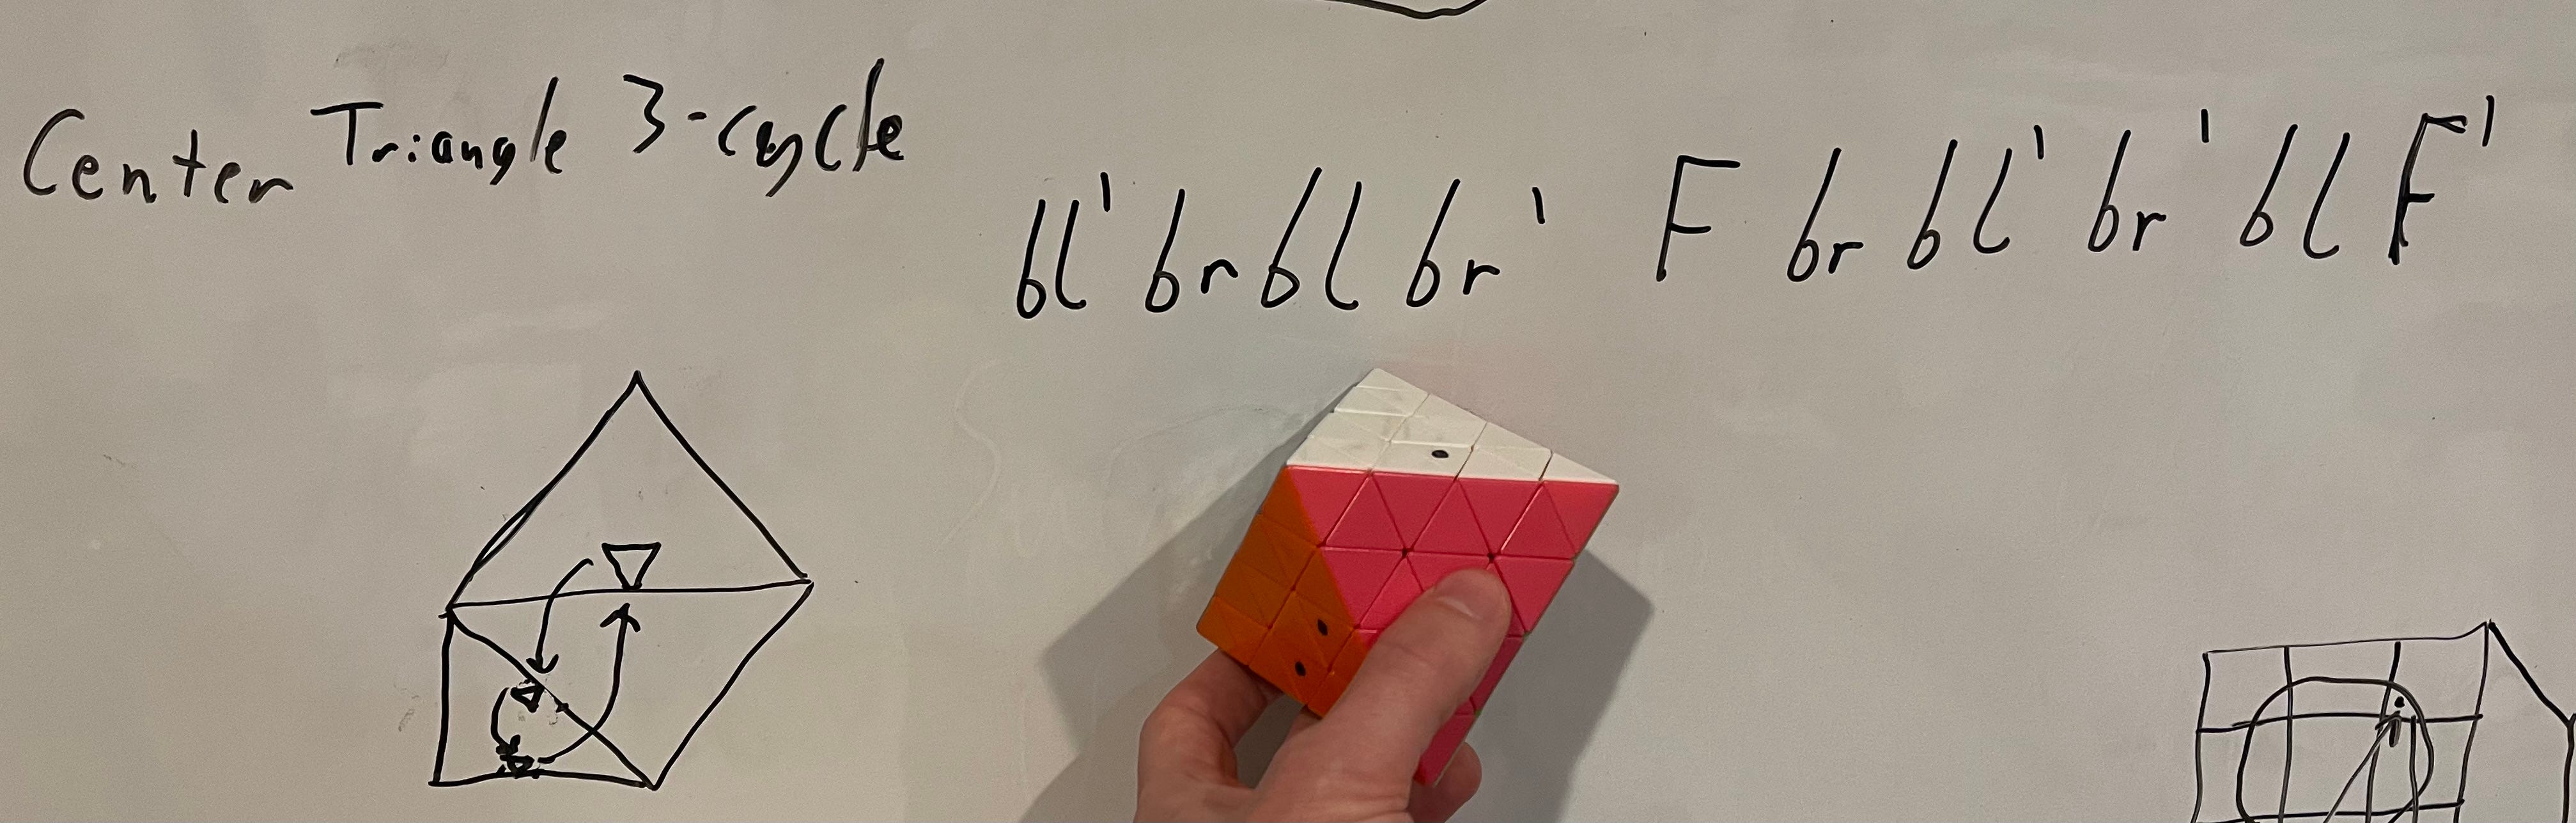
Center-Edge Triangle 3-Cycle
This algorithm will cycle three center-edge triangle pieces. It will be necessary for completing edges. Note the black dot on the pieces that are part of the three cycle, marked in the image below. (Remember, lower case means slice moves, ‘bl’ means the back-left, etc.). See the counter-clockwise direction of the cycle, marked on the drawing on my white board. And pardon the irrelevant drawing of a Crazy 3x3 in the lower right corner.
bl’ br bl br’ F br bl’ br’ bl F’
If you want to cycle them in the opposite direction, simply do the F move first and undo it between the slice moves, as in:
F bl’ br bl br’ F’ br bl’ br’ bl
Compare it to the above, you’ll notice that it’s the exact same algorithm reversed.
You will need this to complete the final edges, if nothing else. In practice I find this useful for creating pairs (one-color and two-color pieces that go together), then doing the edge completion routine described in the prior section. You can also simply pair up the two-color edge pieces and use the three-cycle as an afterthought to complete the edge, or do some combination of all strategies.
Place Completed Edges
Next move the completed edges to the appropriate place, so the color matches the center. I recommend doing this in layers. Do the white face first, for example, then all edges tangent to the white face, then the edges of the yellow face. Mostly this can be done intuitively without any explicit algorithms. You can typically place an edge with an “ R U R’ ” or “ R U’ R’ ” move. Once you have placed the edges on the bottom layer and the middle layer (so all edges tangent to the bottom face), the top layer will not have a final parity. You will be able to solve it just by rotating it into position. Also, notice a cool property of octahedron puzzles. If the edge is correctly placed, it is always in the correct orientation. There is no such thing as an “edge flip” on this puzzle.
Orient and Place Corner Pieces
Now you will place and correctly orient the 4-color corner pieces. You can do this with a series of right- and left-handed sledge-hammer moves, RB’ LB RB LB’ or LB RB’ LB’ RB, and rotations of the puzzle. I recommend moving the white corners into the correct location first, then solving the yellow. Or pick a different color-opposite face color scheme, the solution works the same. You need to develop an intuition for how to move the corners. Note that when you do the first move of the sledgehammer (R’ or L), the top corner will end up in that spot in that orientation, so this is a simple check for “Where is my corner going to go when I do this sledgehammer?”.
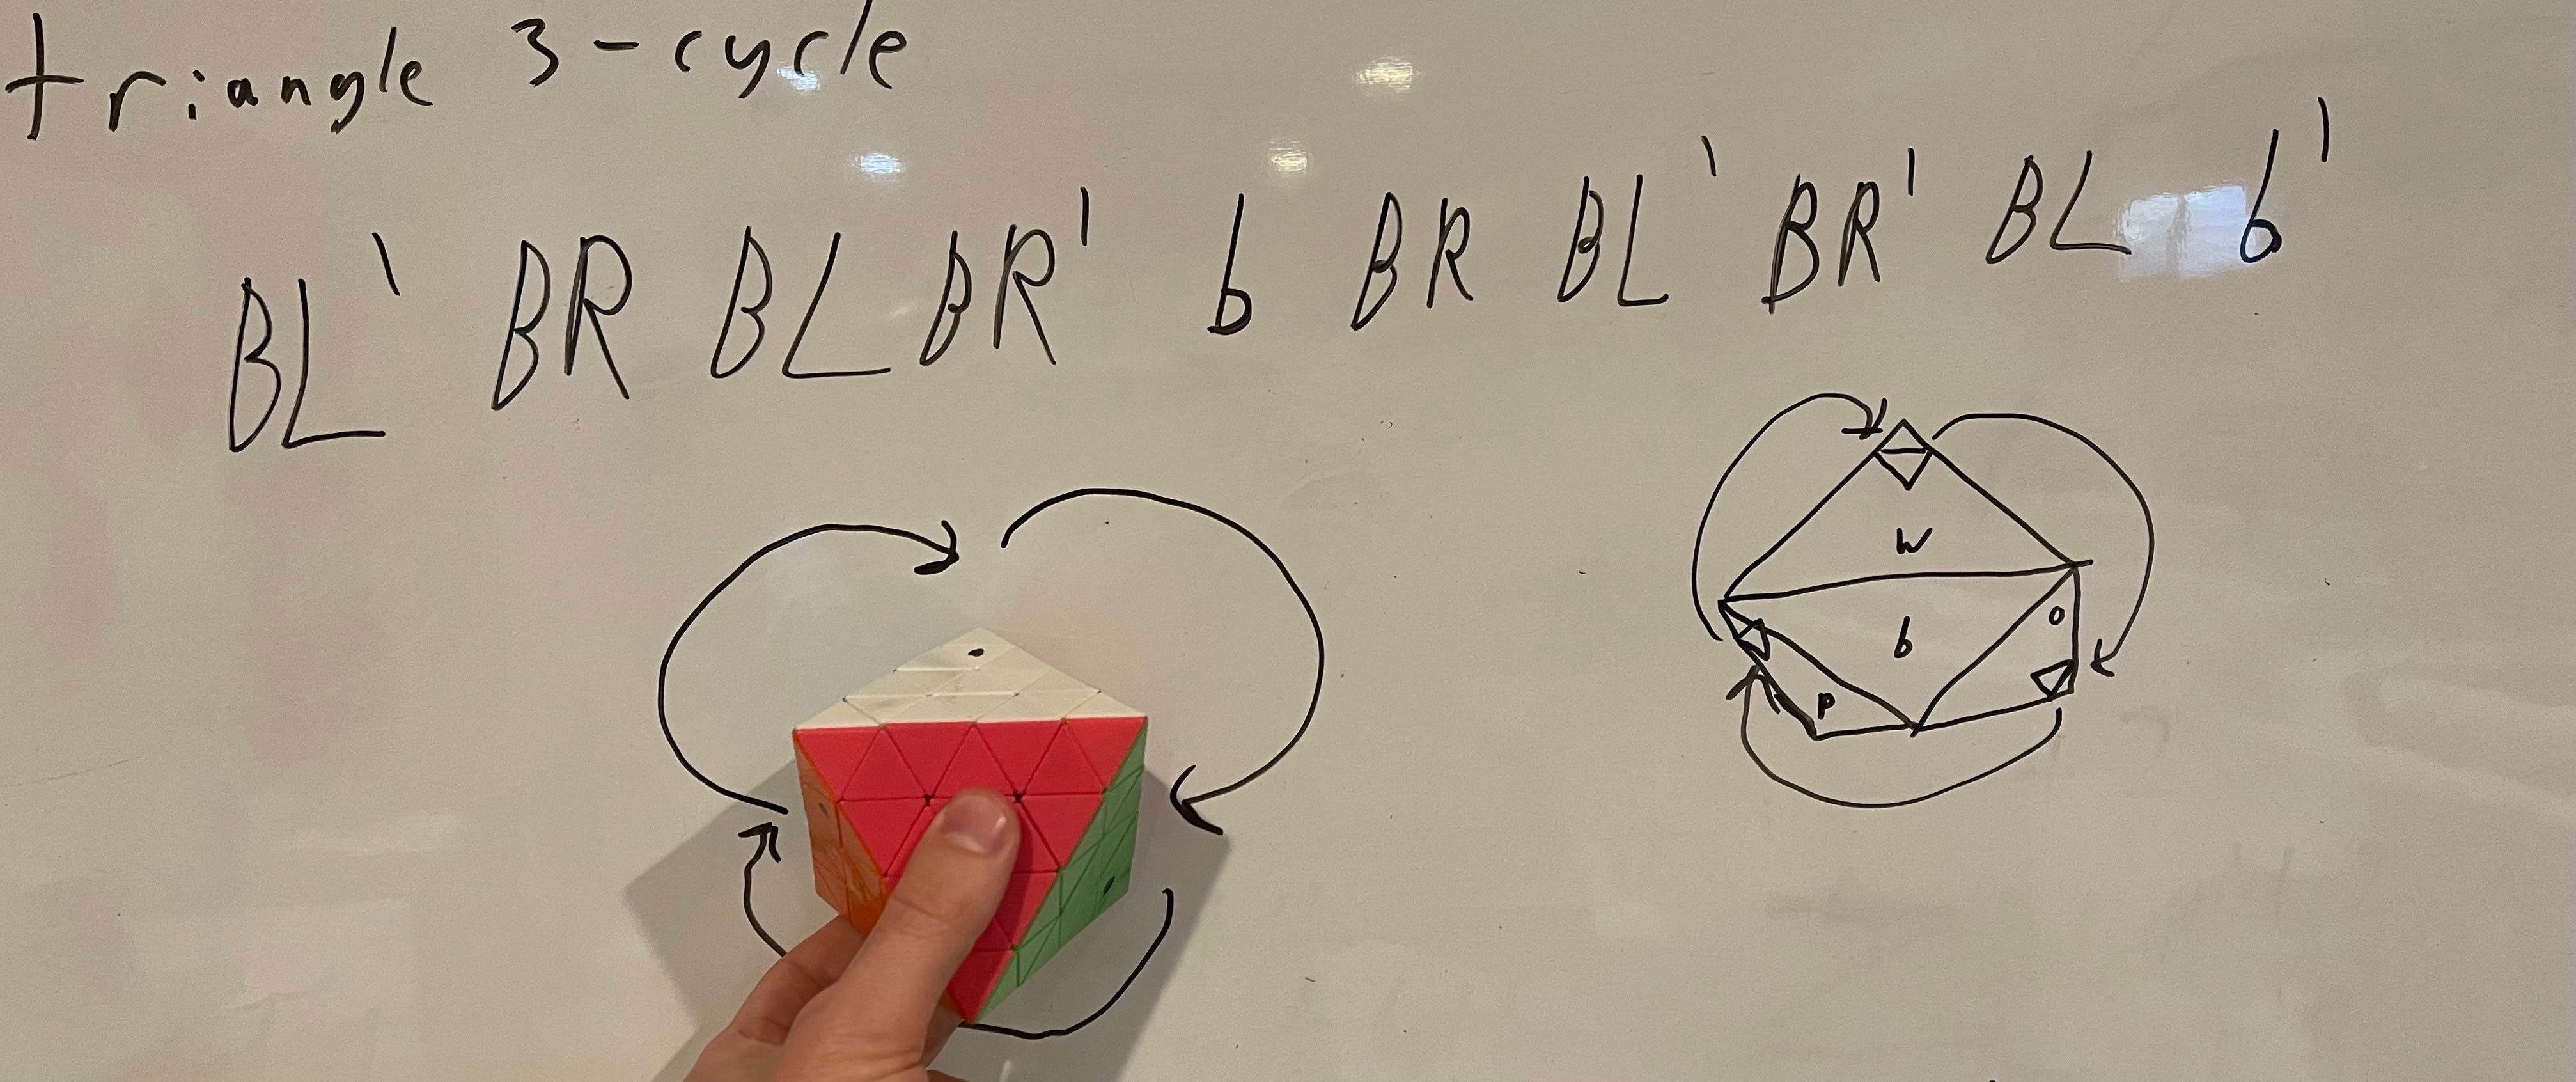
Corner Triangle 3-Cycle
This algorithm will cycle three corner-triangle pieces. Note that it looks very similar to the above algorithm. They “rhyme” with each other. This one has face turns with a “b” (back face slice move, not wide) in the middle, undone at the end. Remember, every slice move must be undone, otherwise you’d break up your edges and misplace the center triangle pieces. Think of this as a rule to help you memorize the algorithms, not as another damn thing to memorize.
BL’ BR BL BR’ b BR BL’ BR’ BL b’
To cycle pieces in the opposite direction begin with the b slice move, and undo it in the middle of the reverse sledge-hammers:
b BL’ BR BL BR’ b’ BR BL’ BR’ BL
This is where you will need to be careful about doing setup moves and reversing the setup. Suppose the triangles I want to cycle are in the right position on the left and up face, but the one on the right face is not. I will need to rotate the right face (an R or R’ move), do the above algorithm, then undo the right face move. It is likely you’ll need to do multiple rotations for some of the 3-cycles in your solve, e.g. do L’ R to set the triangles in the correct position, do the algorithm above, then do R’ L. A mistake here can set you back several steps. If you are tempted to do *three* setup moves, there is usually a more efficient approach. Rotating the puzzle so a different face is on top will often expose a 3-cycle with fewer setup moves. But feel free to challenge yourself. This requirement to remember setup moves is what makes the puzzle fun and challenging. For your first few solves, it might be worth writing down the setup moves, or saying them out loud to help store them in your auditory memory. If you like this kind of challenge, I can also recommend the Earth Crazy 3x3. I understand the other planets in this puzzle series are similar.
You can practice this algorithm and the center-triangle 3-cycle on a regular (3-layer) FTO. The center-edge triangle 3-cycle will move edges in the same relative positions as on a regular FTO. The corner triangle 3-cycle algorithm will move the single-color triangle pieces that are in the same relative positions. Try it and see! This is actually a fun challenge for the regular FTO. Start by correctly placing and orienting the corners, then move the edges and center “petal” pieces with the algorithms above. It is not as efficient as other methods, but it will give you useful practice for the 4-layer FTO. It also offers an efficient method for placing the final edges, as compared to the beginner method I learned. This is a classic case of a higher-order puzzle teaching you something useful and interesting about the more basic version.
Absolutely none of this will make sense without a physical puzzle in your hand that you’re actively trying to solve. So pick one up and enjoy! I got mine from The Cubicle, but a quick search suggests every major retailer of twisty puzzles carries it. MF8 makes a mass manufactured version. It’s pretty solidly built and turns well, though it may require a little lubricant. I lubricated mine as soon as I got it, and I’ve experienced no pops or explosions. For slice moves, I find that doing a wide move then undoing the face move works better than trying to turn the slice independently. Happy twisty-puzzling!